


 Sep 09,2026
Connecting European cable termination to medium voltage (MV) switchgear requires a systematic approach focused on interface cleanliness, proper lubrication, and correct mechanical assembly. The most critical factor is ensuring the plug-in bushing interface is free of contaminants and properly lubricated with silicone grease to prevent partial discharge (PD) — a common cause of premature termination failure. This guide walks through the connection process, key precautions, and what to verify before, during, and after installation.
Understanding European Cable Termination Systems
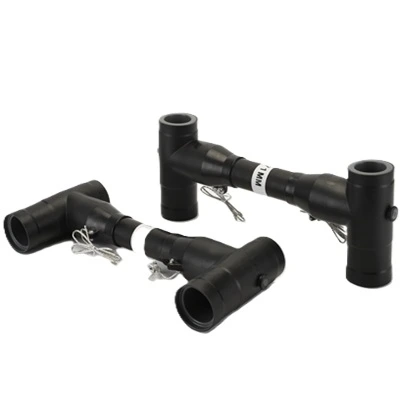
European cable termination systems, commonly used in C-GIS (Compact Gas-Insulated Switchgear) and Ring Main Units (RMU), are designed around standardized plug-in bushing interfaces. These systems typically consist of:
-
Front connector: Installed directly onto the switchgear bushing — this is the foundation of the connection system
-
Rear connector: Designed to be installed onto the back of a front connector
-
Plug-in bushing: The interface component mounted on the switchgear that accepts the cable connector
The key advantage of European-style terminations is their simple plug-in installation, which reduces field assembly time compared to traditional termination methods. However, this simplicity does not mean the installation process can be rushed — attention to detail at every step is essential for long-term reliability.
Tools and Materials Required
Before beginning the connection process, ensure the following items are available:
| Item | Purpose |
|---|---|
| Specialized cleaning agent | Remove contaminants from interface surfaces |
| High-quality silicone grease | Ensure tight fit and exclude air from the interface |
| Clean lint-free wipes | Apply cleaning agent without leaving residue |
| Torque wrench | Tighten mechanical connections to specification |
| High-voltage detector | Verify de-energized state before work |
| Personal protective equipment (PPE) | Ensure operator safety |
| Manufacturer's installation instructions | Reference for specific model requirements |
Step-by-Step Connection Process
Step 1: Safety Preparation
Before any physical work begins, the switchgear must be de-energized and isolated. Verify the absence of operating voltage using a high-voltage detector. Lock out and tag out the equipment to prevent accidental re-energization during the installation process.
Safety Note: Even though high-quality European connectors are wrapped in an outer semi-conductive shielding layer that must be reliably grounded, electrical operating procedures typically require that the equipment be de-energized or confirmed safe before any physical contact.
Step 2: Cable Preparation
Proper cable preparation is critical for termination success:
-
Strip the cable insulation to the dimensions specified in the connector manufacturer's instructions
-
Prepare the conductor — install the appropriate cable lug or connector according to the termination kit specifications
-
Install the stress control components as required by the cable type (XLPE or EPR insulated)
-
Ensure the cable screen is properly prepared for grounding
The termination procedure should follow applicable standards such as IEC 60502-2 (power cables with extruded insulation for rated voltages from 1 kV to 30 kV) and EN 50181 (plug-in type bushing interface specifications).
Step 3: Interface Cleaning
This is the most critical step in the entire connection process:
-
Inspect the bushing interface on the switchgear for any visible damage or contamination
-
Apply specialized cleaning agent to a clean lint-free wipe
-
Thoroughly clean both the bushing interface and the connector interface
-
Allow the surfaces to dry completely — no residue should remain
Contamination at the interface is one of the leading causes of partial discharge in cable terminations. Even microscopic particles can create stress points that lead to PD activity and eventual failure.
Step 4: Lubrication
After cleaning, apply high-quality silicone grease evenly to both mating interfaces:
-
Apply a thin, uniform layer — not too much, not too little
-
Ensure complete coverage of the mating surfaces
-
The grease serves two purposes: it facilitates assembly and, more importantly, it excludes air from the interface to prevent partial discharge
Step 5: Connector Assembly
-
Position the cable so it is properly aligned with the switchgear bushing
-
Insert the connector onto the bushing — for many European connectors, this can be done without tools for the initial engagement
-
Push the connector fully home until it seats completely against the bushing shoulder
-
Install the fixing device — hand-tighten initially, then torque to the manufacturer's specified value
Tip: If the connector does not slide on smoothly, do not force it. Remove, re-clean, re-lubricate, and try again. Forcing a misaligned connector can damage the interface and create future failure points.
Step 6: Grounding Connection
-
Connect the cable screen to the earth busbar
-
Ensure all grounding connections are secure and have low resistance
-
Verify that the outer semi-conductive shielding layer is reliably grounded
Proper grounding is essential for safety and for maintaining the "touch-safe"特性 of screened connectors.
Step 7: Mechanical Support
-
Install cable clamps to provide strain relief
-
Position adjustable cable mountings according to the cable characteristics
-
Ensure the cable has adequate slack to permit unrestricted movement of the connector
Cable clamps should be manufactured from high-strength flame-retardant materials suitable for the application environment.
Step 8: Final Verification
-
Visually inspect the completed connection
-
Verify all mechanical fasteners are properly torqued
-
Confirm grounding connections are secure
-
Document the installation for maintenance records
Common Mistakes to Avoid
| Mistake | Consequence | Prevention |
|---|---|---|
| Incomplete cleaning of interface | Partial discharge, premature failure | Use specialized cleaning agent; allow to dry completely |
| Insufficient or uneven silicone grease | Air pockets at interface leading to PD | Apply thin, even coat; ensure full coverage |
| Forcing connector during assembly | Interface damage, compromised sealing | Remove, re-clean, re-lubricate if resistance is felt |
| Improper torque on fixing device | Loose connection or damaged components | Use torque wrench; follow manufacturer's specification |
| Neglecting grounding connection | Safety hazard; induced voltage on surface | Verify ground connection resistance; ensure reliable grounding |
| Using wrong voltage class components | Insulation breakdown; catastrophic failure | Verify voltage rating matches system requirements |
Selection Considerations for European Cable Termination
When selecting cable termination components for MV switchgear, voltage rating alone is not sufficient. Consider the following factors:
| Factor | What to Verify |
|---|---|
| System voltage | Match termination rating to system voltage (e.g., 12kV, 24kV, 36kV) |
| Cable type | XLPE or EPR insulated; screen construction (copper wire or tape) |
| Conductor size | Ensure termination kit accommodates the cable cross-section |
| Bushing interface | Confirm compatibility with switchgear bushing type |
| Environmental conditions | Consider temperature, humidity, pollution level |
| Standards compliance | Verify compliance with IEC 62271-209 or applicable standards |
European cable terminations are designed to meet standard interface dimensions, making them compatible with major European switchgear brands. However, always confirm specific compatibility with your equipment manufacturer.
Partial Discharge Prevention
Partial discharge is the single most important performance for cable terminations. Quality European cable terminations should maintain PD levels below 10pC. To achieve this during installation:
-
Keep interfaces scrupulously clean — contamination is the #1 cause of PD
-
Apply silicone grease correctly — it excludes air and prevents PD inception
-
Avoid damaging the insulation during cable preparation
-
Ensure proper stress control — the stress control components must be correctly positioned
Research has shown that the method of assembling cable terminations significantly influences PD activity. Following the manufacturer's installation instructions precisely is not optional — it is essential for reliable operation.
FAQ
Q: Can front connectors and rear connectors be used interchangeably?
No, they are not interchangeable. The front connector is installed directly onto the switchgear bushing and serves as the foundation of the connection system. The rear connector is designed to be installed onto the back of a front connector.
Q: Is it sufficient to consider only the voltage when selecting European cable terminations?
No. While voltage rating is critical, you must also consider cable type, conductor size, bushing interface type, environmental conditions, and applicable standards.
Q: Why is silicone grease application so important?
Silicone grease serves two essential purposes: it facilitates smooth assembly of the connector onto the bushing, and more importantly, it excludes air from the interface to prevent partial discharge. Air pockets at the interface create stress points where PD can initiate.
Q: Can the cable connector surface be touched during operation?
Theoretically yes, as the outer semi-conductive shielding layer should maintain the surface at zero potential when properly grounded. However, electrical operating procedures typically require equipment to be de-energized before any physical contact. If the grounding connection is poor or the shielding layer is damaged, high voltage may be induced on the surface.
Q: What is the most common cause of cable termination failure?
Contamination at the interface is the leading cause of premature termination failure. Even microscopic contaminants can create stress points that lead to partial discharge and eventual breakdown of the insulation.
Q: What standards apply to European cable termination connections?
Key standards include IEC 60502-2 (power cables with extruded insulation), EN 50181 (plug-in type bushing interfaces), and IEC 62271-209 (cable connections for gas-insulated switchgear).
Conclusion
Connecting European cable termination to MV switchgear is a procedure that demands careful attention to cleanliness, lubrication, and proper mechanical assembly. The three most critical factors for a successful connection are:
-
Meticulous interface cleaning — contamination is the #1 cause of failure
-
Correct silicone grease application — excludes air and prevents partial discharge
-
Proper mechanical assembly — correct torque and secure grounding
Avoid the common mistake of rushing the installation or skipping the cleaning step. A poorly installed termination may function initially but will likely develop PD issues that lead to premature failure and unplanned downtime.
For more information on cable accessories and termination components, review the available cable accessory configurations. If you have specific technical questions about your switchgear cable entry requirements, contact our engineering team for application guidance.


-Temperature-Controller-1.webp)